Getting Started
From registration to a fully set-up multi-staff account, ready for services, rota, and bookings.
Welcome to SalonLogic Pro
SalonLogic Pro is built for salons with staff. Everything in Solo, plus a full team directory, rota and commission, leave and absence, performance and training, and multi-employee diary and till.
Most of your business details are captured once, during registration, and carried straight into your account — you shouldn't need to enter your business name or address a second time. The steps below cover what's set during registration, what to check afterwards, and how to get your team into the system.
Set up in order
Work through the steps below before entering operational data. Getting your company and VAT details right at registration, and your team set up before you start building the rota, means everything downstream — payroll figures, commission, the diary — works correctly from day one.
- ①Register your account — business details, VAT, and plan selection in one form
- ②Check your company profile — confirm everything carried over correctly, and review Holiday Year and Clock-in settings
- ③Add your team — one at a time, or bulk import if you're migrating from another system
- ④Add your services — before touching the pricing calculator
- ⑤Build your rota — once your team and their roles are in place
Registration
Everything starts with a single registration form — personal details, business details, holiday year settings, VAT, and your plan, all on one screen.
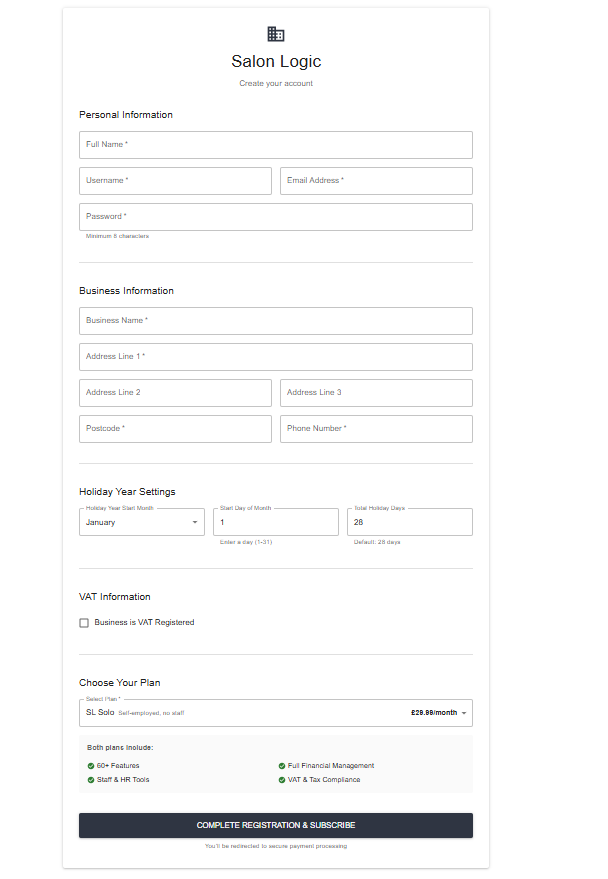
Registration — this single form sets up your account, business profile, and plan together
What's captured
| Section | Fields |
|---|---|
| Personal Information | Full name, username, email address, password |
| Business Information | Business name, address (lines 1–3), postcode, phone number |
| Holiday Year Settings | Holiday year start month, start day, total holiday days (defaults to 28 — the UK statutory minimum) |
| VAT Information | Business is VAT Registered — a single checkbox at this stage |
| Choose Your Plan | SL Solo or SL Pro, with monthly price shown |
Company Profile & VAT
Go to Settings → Company Settings to review everything that came over from registration, and to finish off your VAT details.

Company Settings — Business Details, Holiday Year Settings, VAT Settings, and Clock-in Settings
This page has four cards:
| Card | What it covers |
|---|---|
| Business Details | Business name, address, postcode, phone, business email — the same fields from registration, editable here |
| Holiday Year Settings | Holiday year start month and day, default annual holiday entitlement |
| VAT Settings | The VAT Registered toggle, plus — once switched on — your VAT number and VAT scheme (e.g. Flat Rate) |
| Clock-in Settings | Enable clock-in/clock-out for staff, and optionally require location verification for clock-in |
Editing Company Details Later
Day to day, you don't need to go back into full Company Settings just to fix an address or update your phone number. The Money Dashboard has its own quick edit option for exactly this.
From the Money Dashboard, use the Edit button to open a lightweight Edit Business Details panel — Business Information and the VAT Registered toggle, with your password required to confirm the change.
Setting Up Your Team
With your company profile confirmed, add the people who'll actually be using the system. Go to Team → Employees → Add Employee for personal and employment details, and assign each person a role.
| Role | Typical use |
|---|---|
| Owner | Full access across the account |
| Manager | Sees only what the Owner has authorised — nothing by default until configured |
| User | No access to the admin app — limited to the self-service Employee Portal |
Full detail on the employee directory, the employee card, and roles and permissions is covered in Team & Employees — this is just enough to get your first few staff added.
Importing Existing Data
Migrating from another system? Go to Data → Import for the bulk-upload hub covering employees, products, services, expenditure, suppliers, income, and clients.
Full step-by-step detail on the Employees import — including the instructions tab, upload screen, and how validation errors are shown — is covered in Team & Employees.
Where to go next
Company profile confirmed, team added — now build your service menu and get your rota in place.